

Valentine Candle-making: Three Ways!
- Feb 5, 2025
- 4 min read
Updated: Feb 6, 2025
Candle-making is gaining popularity right now, and we think the trend is so cute! Here are 3 ways you can get in on the fun! As a mom with an age gap, I love how adaptable it is for a wide range of ability levels. My teens enjoyed it, and so did my 2nd grader and preschool neices!
(Hint: this would also make for a super fun girls night!)
Method One: Painted tapers with colored votive candles
My daughter Emma chose to paint directly on a taper candle with the melted wax from colored votive candles. This method required the most artistic ability and patience, but it was also the simplest to set up and get going! Emma chose to do simple hearts on her candle, and they were very cute!
*If you do not intend to light the candles, acrylic paint adheres well and is easier to work with. This adaptation would be great if you're doing this craft with smaller children, and want to avoid the flames.


Supplies Needed:
Directions:
Set up your work station with a paper towel, your paintbrushes, and a disposable glass of warm water.
Place the candle you will paint on into a holder.
Choose a few colors to paint with using the colored votive wax. Light the candles when you're ready to begin and wait a minute or two for the wax to begin to melt.
Dip the paintbrushes directly into the melted wax, and apply it to the candle.
Dip the paintbrush into the hot water after each pass, and use a new paintbrush for each color.
Tip: We recommend doing multiple thin layers, while allowing the wax to fully dry in between coats.
Method Two: Wax bows on taper candles
My daughter Isabelle chose to create these red taper candles with little wax bow embellishments. They are adorable, and perfect for Valentine's Day!


Supplies Needed:
Directions:
Set up your work station with a paper towel.
Place the candle you will paint on into a holder.
Choose a wax melt according to the color you'd prefer for the embellishments, and place it in the plastic mixing cup. 1-2 squares are enough to fill the mold and decorate one candle.
Microwave the wax melts under careful superivsion, checking every 15-20 seconds. Give it a stir with a q-tip or plastic spoon.
Pour the melted wax into the mold (leaving a small amount still in the cup).
Let the wax cool and harden for a few minutes. You can pop them in the freezer, too.
Remove the tiny bows from the mold, and use the remaining melted wax to affix the bows to the candle.
Tip: affixing the bows to the candle was tricky. We found that it worked best if you make a "paste" with slightly melted wax. Keeping it this consistency is a little challenging, so expect to microwave the wax a few times as needed.
Use a q-tip to place a small dollup of wax "paste" on the back of the bow. Hold it on the candle for 30 seconds until hardened in place.
Method Three: Poured candles with wood wicks + heart embellishments
This particular method was our favorite, and is the most kid-friendly! That being said, it does have the most steps. My eight year old, Olivia, tried this method with her younger cousins and it was a lot of fun! She plans to do it again for a Galentine's party using the colors of conversation hearts. Very cute!


Supplies Needed:
Soy Wax Melts for candle base
Candle Making Pot Wax Melts for molds
*(You will have leftover supplies for next time)
Directions:
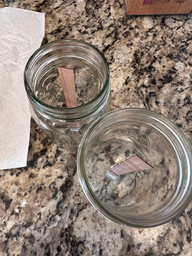
Set up your work station with a paper towel, a mason jar, a wood wix with its metal base, and the rest of the supplies listed above.
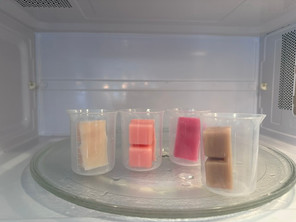
Choose wax melts according to the color you'd prefer for your heart embellishment, and place it in the plastic mixing cups. We used 4 different colors, and 1-2 squares in each cup. This was more than enough for two candles.
Microwave the wax melts under careful superivsion, checking every 15-20 seconds. Give it a stir with a q-tip or plastic spoon.
Pour the melted wax into the mold.
Let the wax cool and harden for a few minutes. You can pop them in the freezer, too.
While you are waiting, open your bag of soy wax melts and place them in your candle making pot. Place the pot in the center of a pot or saucepan with boiling water in it.
Add fragrane if so desired.
Grab your mason jar and wick. The wooden portion fits inside the metal base, as can be seen in the picture above. An optional extra step is to carefully place a small amount of wax on the bottom of the metal base and use this to "glue" the wick to the bottom of the mason jar.
Tip: while you work on this, have little ones help remove the wax from the heart molds and sort colors!
Once the wax in your candle making pot is completely melted, carefuly pour it into the mason jar, about 2/3 of the way full. Let it harden for a bit, but not completely. See the picture above. You want the edges to begin to solify, but the center sho still be soft.
Have the little ones sprinkle the molded hearts over the candle until you can no longer see the base layer of wax. Some should sink a bit, and this is what you want!
Cut the wick accordingly, being sure that it will not stick out over the top of the jar.
*I earn a small commission from qualifying purchases, as an amazon associate.


Comments